Following are full-color pictures from The Complete Guide to Chinese Medicine Bloodletting by Dean Mouscher
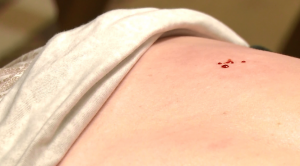
Fig. 2-1. Capillary bleeding on a patient’s back. The back has been lanced 4 times using 4 separate safety lancets. The next step will be to apply a suction cup to help draw out blood. That is the reason for the cup in wet-cupping – without the cup, capillary bleeding yields little blood.
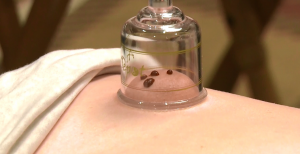
Fig. 2-2. Here the cup has been applied. You can see how the suction helps draw out blood during capillary bleeding. This is wet-cupping.
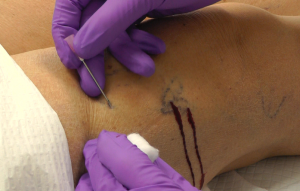
Fig. 2-3. Venous bleeding above the knee using a 1.5″ 18 gauge hypodermic needle. Thumb and forefinger hold the top of the needle while the middle finger controls the tip. In venous bleeding, no cup is necessary. Note how dark the blood is. This is a sign of blood stasis and a welcome sign to the practitioner, as it is a good indication that blood stasis is being removed and that the procedure will be effective
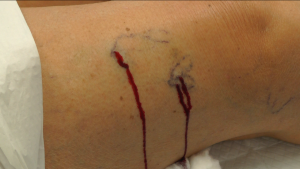
Fig. 2-4. Directly bleeding superficial “spider veins” in a patient’s leg. The needle used was a 20 gauge hypodermic needle. Such veins are very superficial, and the needle is inserted just a few millimeters. Cupping is not necessary when bleeding veins directly. The amount of blood obtained was about a teaspoon (5 mL) from each prick.
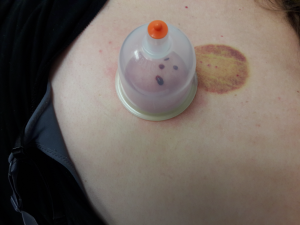
Fig. 2-7. Wet-cupping a patient’s back after 4 painless, superficial pricks with spring-loaded safety lancets. You can see the adjacent wet-cupping mark from a few days earlier.

Fig. 2-8. In the Master Tung numbering system, 99.08-1 is the apex of the ear and the main point to bleed. I usually just bleed there when bleeding ears, but sometimes bleed an additional point or two on the helix between 99.08-1 and 99.08-2.
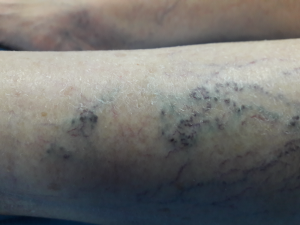
Fig. 4-2. Bleeding dark, superficial veins such as these is unlikely to result in bruising.
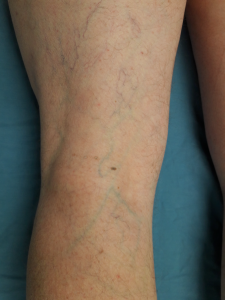
Fig. 4-3. Bleeding faint, greenish veins such as those pictured above is more likely to produce a bruise. Should you see one forming, simply apply pressure long enough for clotting to occur at the vein – approximately 2 minutes in most cases. When you release pressure, observe the site for at least ten seconds more to make sure that subcutaneous bleeding (bruise formation) has stopped.
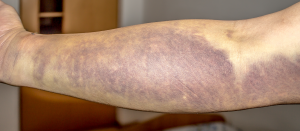
Fig. 4-4. By following proper procedure, bruising such as this can be prevented.

Fig. 4-5. Avoid bleeding varicose veins such as these.
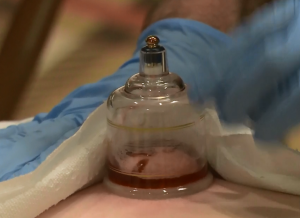
Fig. 7-22. Place rolled up paper towels around the lower edge of the cup.
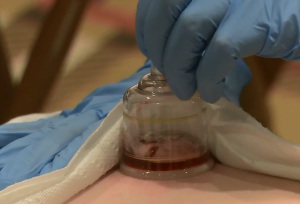
Fig. 7-23. If using a plastic cup, pull up the valve at the top of the cup to release suction.

Fig. 7-24. Press down gently on the skin with the lower lip of the cup and carefully tilt the cup toward the lower edge.
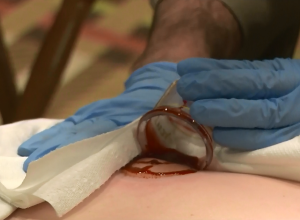
Fig. 7-25.
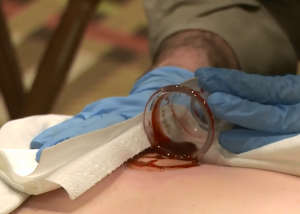
Fig. 7-26
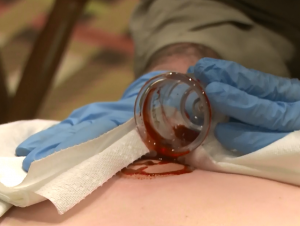
Fig. 7-27. Once the contents are in the cup, you can remove it, place a wad of paper towels or cotton into the cup to soak up the blood, and discard.
Fig. 7-28.
Fig. 7-29 shows the back of a woman who comes in for sciatica. You can see the dark cupping mark and punctures from 5 days earlier, and also where I found a new tender point and cupped.
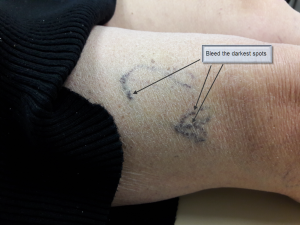
Fig. 8-1. “Ideal” veins for bleeding. You could bleed any points along these veins; the arrows point to a few good choices.
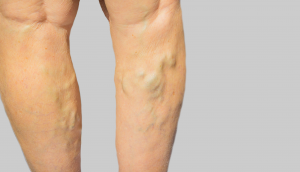
Fig 8.2
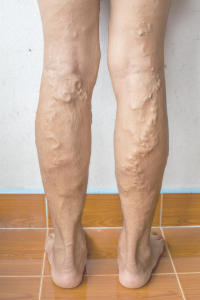
Fig. 8-3. Never directly bleed ropey, bulging varicose veins such as those in the above 2 pictures.
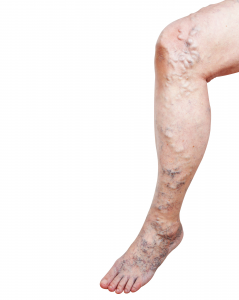
Fig. 8-4. Avoid bleeding ropey, bulging varicose veins such as those near the knee in the picture above. However, you can treat those varicose veins effectively by bleeding the dark, flat veins in the lower leg and foot.
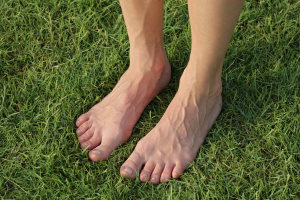
Fig. 8-5 Avoid bleeding protruding veins such as these.
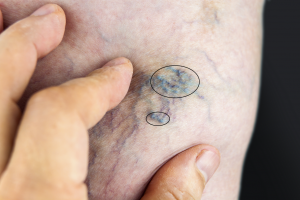
Fig. 8-10. These veins protrude a bit but they are not varicose veins, just a cluster of blood stasis, and they SHOULD be bled. Dark blood can ooze from such veins for a while so keep squeezing and wipe every 30 seconds or so with an alcohol swab to prevent a clot from forming, and keep the blood flowing until it’s mostly done. Prick a dark spot in the lower circle first, then one or two in the upper circle – do not prick the upper circle first because the blood will make it hard to see the veins in the lower circle.
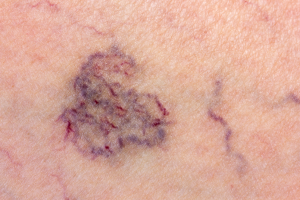
Fig. 8-11. This is a nice cluster of blood stasis that should be bled. Two or three pricks should suffice; be sure to bleed the lower points first so that flowing blood does not obscure your view. Superficial, dark veins such as these generally do not bruise.
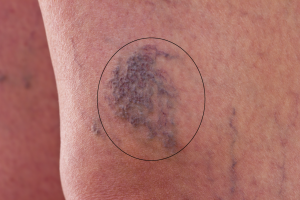
Fig. 8-12. These veins also protrude but again, these are not varicose veins and they SHOULD be bled. Prick two or three. Keep squeezing blood out and wiping with an alcohol swab to keep the blood flowing until it is done. Such bleeding is unlikely to result in bruising; to the contrary this could also be considered “cosmetic bleeding” as this patch will be more faint afterwards.
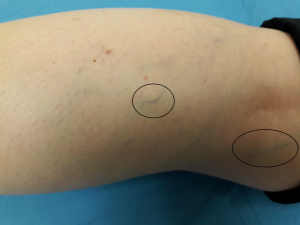
Fig. 8-13. Often you will not find any prominent dark veins – the most you will find is thin veins such as these. Nevertheless, bleeding them can have profound effects, even if just a small amount of blood is released.
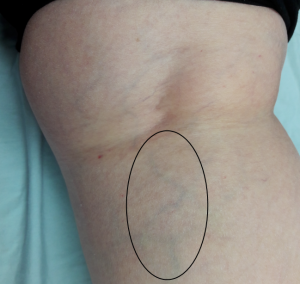
Fig. 8-14. Sometimes the only veins you find are so faint you can hardly see them – they are still good to bleed.
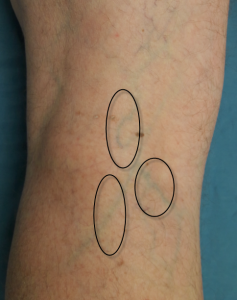
Fig. 8-15. These veins are faint but they are clearly visible and therefore good to bleed if there seems any reason to do so – indications such as sciatica, abdominal pain, occipital headache, hemorrhoids and many more.
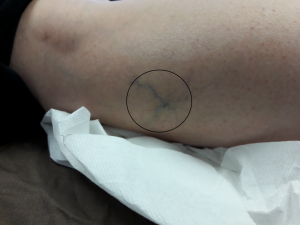
Fig. 8-16. This patient presented with an occipital migraine. Upon inspection, this vein, just proximal to GB36, was the only visible vein on her leg. Even though it is outside of the Tung “occipital region,” I bled it and the patient’s migraine immediately reduced 80%. This is a good example of “Bleed what you see, wherever it is.”
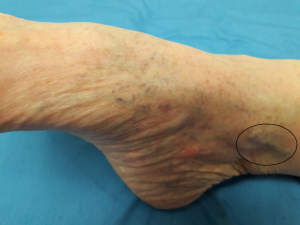
Fig. 8-17. This protruding vein should not be bled. The dark, flat veins on the ankle, however, can be bled.
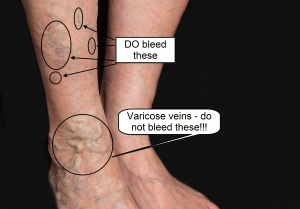
Fig. 8-19. Do NOT bleed the varicose veins circled in this picture at the woman’s right ankle. However, you can and should bleed the dark, flat veins circled above the ankle.
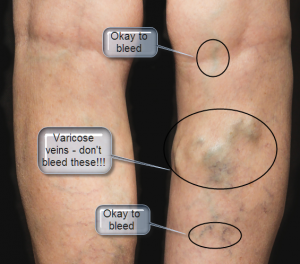
Fig. 8-20. Avoid bleeding the bulging varicose veins, but DO bleed flat, visible veins in the same leg.
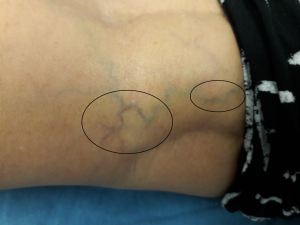
Fig. 8-21. This woman presented with stubborn occipital headaches and – conveniently – prominent dark veins right in her Master Tung “occipital region.” The headaches resolved after bleeding twice – once within the circles, and once wet-cupping her back (B points tender to palpation just lateral to the spine at approximately T9-T10).
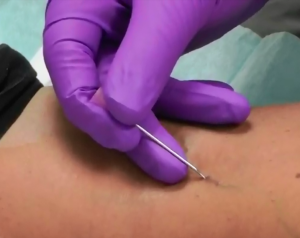
Fig. 8-23. Holding an 18g hypodermic needle with the plastic nib between thumb and forefinger, and the middle finger controlling the tip. This picture was taken a split second before pricking the vein with a quick “rolling” motion.
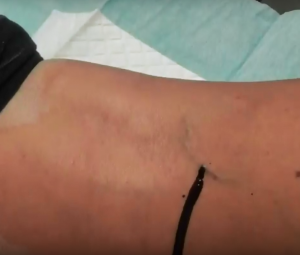
Fig. 8-24. A moment later, after pricking that vein. Note the dark color of the blood. This patient, Tasha, has interstitial cystitis and had come in for treatment of a flareup. Bleeding the UB40 or ST36/GB34 area almost never fails to bring her instant relief.
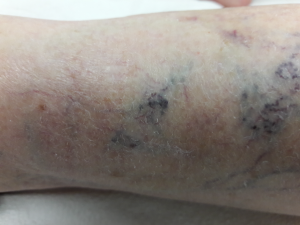
Fig. 8-25. These dark veins are a clear indication of blood stasis; it is good to bleed them.

Fig. 10-1. Example of a large bruise caused by a punctured vein that bled subcutaneously. In this case nobody was at fault – the puncture was caused by a cat who had been sitting in its owner’s lap while both were sleeping. The phone rang, the owner and cat were startled and the cat dug in its claws, one of which pierced a vein with the result you see. Happily no lasting harm was done and the bruise resolved in a few weeks.
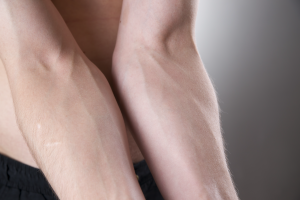
Fig. 10-2. Visible veins in the cubital fossa. It is better to avoid bleeding veins that protrude. If you see a protruding vein, simply follow it to where it is flat to the skin and prick there.
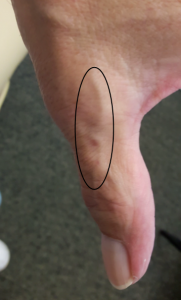
Fig. 10-8. Tung “point” 11.26 is sometimes shown as 3 points along the vein but in reality you can prick anywhere along the circled vein. Only one prick is necessary. It is typical for this vein to bulge like this when bleeding is indicated. Normally you should avoid bulging veins but in this case (11.26) it is okay to bleed slightly bulging veins such as this. This patient had delayed healing of an operation on his index finger, which was swollen and painful. After bleeding this vein, the pain diminished to zero.